Showing posts with label 3D Max. Show all posts

Thursday, 20 May 2010

Hot Air Balloons and Church Model

To better practice my UVW Wrapping skills, I created simple shapes which need better wrapping techniques to make them look more lifelike. I chose an angular building (church), which is made up of many different parts all attached together after working with the textures.


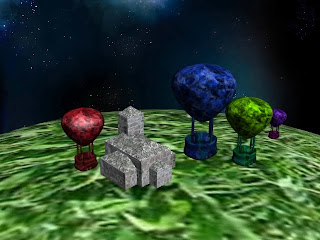
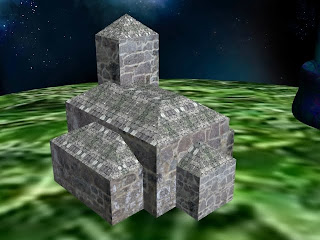
I used two hand-created textures for the church - one which represents old brick and one which represents old slate tiles for the roof sections. I used the UVW Unwrapping process to ensure the roof was a different texture to the brickwork, in the hopes of making it look more realistic. The hot air balloons also depict my own hand-made textures, but they deliberately look a little more wild and colourful, rather than going for attention to detail as I did with the church.


I have found that it is incredibly fiddly and time-consuming, but the end results are quite positive. The Grassy background is simply just to make it look like it is actually standing on something, so I'm not too fussed that it doesn't look quite as realistic. Maybe if I were to include this as part of a portfolio, I would work a little more on making the grass look more like grass, rather than greenish blurs. But as my main focus for this post is the building itself, I don't mind too much at the moment. It's something I will work on at a later date.

UVW Unwrapping

This is a screenshot of the UVW Unwrap process I have started. I plan to incorporate a new texture, combining a more metalic looking texture with a more organic looking texture. This is to help make it more obvious that it is actually a built space-ship.

To do this, I created the two separate Textures using Adobe Photoshop and combined them using an Overlay alteration so as to see both at the same time and be able to work with them together.


I then had to go into 3D Max and add a UVW Unwrap Modifier. Next, I went into the 'Edit' and used the 'Flatten Mapping' tool to smooth out and separate the individual pieces of my model. I then used Print Screen to copy this model structure over into Photoshop to work with it.

Finally, it was simply a matter of altering the different sections with my two textures (Shown in the screenshot below after taking out the UVW Breakdown), before saving it as a total texture and using the 'Materials' tool in 3D Max to wrap it around my model.

The image at the top shows the above texture wrapped around the small part of my model. After creating this one, I shall use the same process to create similar textures to wrap around the other sections.

Thursday, 18 March 2010

3D Spaceship Contd ...

I have further developed my 3D Spaceship model to include a propeller and textures. The texture I have created using Adobe PhotoShop, with a combination of different Fractal and Smoke Brushes, plus multiple colours. The image has also had Hue and Saturation altered slightly to make it less of an eye-sore.

For the propeller, I have created a simple metallic texture and overlayed using the 'Material Editor' tool in 3D Studio Max. For the ship itself, I wanted to go for more organic, natural colours, and so chose to create a texture that reflects plant-life and nature : containing green and brown tints. Initially, the texture looked rather stretched and unprofessional over the pointed area above the propeller. Therefore, to amend this, I created a Sphere, altered the shape using a Taper tool, and then textured this with the same material. This has covered up the area that was troubling me, and also helps to even out the point (which I didn't think looked all that organic in the first place).


My next step for this project is to look into lighting and shading. Perhaps I can create a 'greenhouse' effect for the mushroom shapes on the model? We shall see, soon enough ...

Thursday, 11 February 2010

Today, I've been working a little more on my 3D Max model of a spaceship. I have adjusted the original, cloned it a further 3 times and started altering the joints between the domes and the stems. I will use the process of welding to get them roughly together, and then will delete un-needed polygons and re-create them in a more orderly, tidy fashion.

Thursday, 10 December 2009

3D Max Plane


To create this 3D model of a plane, I created a cylinder, turned it into an Editable Mesh, and used a collection of different alteration methods to extrude, move, resize and weld different sections into the rough shape of a spacecraft.

To make the craft identical on both sides, I created one side of the craft, and then used the 'clone' method to copy it. Finally, I hit the 'Mirror' button to create the finished product and attached and welded the sections together to make
one final model. For the image below, I took the same file as above, altered the wings slightly to reduce the width of them and also used an extrude and 'Bevel' tool to create a small area at the front for the cockpit.

Thursday, 5 November 2009

Creating a 3D Toy in Max


This is a simple 3D toy which I have created using 3D Studio Max. To create it, I have used skills such as Bevel, Extrude, Weld and Attach. I have created a number of different shapes - including squares, cylinders, cones and circles, and then extruded parts to extend them, welded parts together to tidy everything up, and attached each of the shapes together to make it complete. In this Render, it doesn't look quite as good as my model, as there is a cone which goes between the head and the body - it doesn't show up in the render, though.

I got the idea to create this, as I used to play with 'wind-up' toys a lot when I was little: an example of which is found in this next image. I found them very entertaining.

With this 3D Model, I wanted to create a wind-up toy which would move (thanks to the wheel at the front). However, this would take a great deal more work before it is complete and 'useable'. As it is, the wheel wouldn't move, for instance, because the body resting on it is too 'square'. It would just drag along the floor if it worked at all. To make it more realistic, I would have to remove any part that could impede on movement, and would also probably need a second wheel at the back to help support the model. Also, I would want to make the 'wind' look more like the ones I used to use, rather than having it a simple square.
Considering this has taken me a few hours and it is still very basic, I would imagine it could take days or possibly even weeks to come up with a finished, final, professional model for a toy of this style.

If I have more time on this, I would like to round off the model and make it a little bit more realistic in terms of usability - remove the barriers stopping it from potentially moving and just tidy the whole model up.

Monday, 2 November 2009

3D Modelling - The Pumpkin

Using a tutorial to refine the more complex parts of this model, I have managed to create a Halloween Pumpkin using 3D Studio Max. I am very happy with how it has turned out, and considering I have only been playing with Max for a couple of weeks, feel very proud of this achievement.

With a little support from my Tutor, Chris, I managed to add in some suttle lighting effects, with the intention of making it look that little bit more 'creepy'. I feel it has worked.
The only negative is it is a little dark against the black background, but when I tried to amend this, it lost the 'spooky' feel I was going for as it was too illuminated.

But other than this, I am really happy with this model. Not only was it successful, but it was also fun to make, as well.